
David G. Simmons
Monday, October 21, 2024
How to secure your Raspberry Pi and enable safe, resilient updates
TL;DR
The venerable Raspberry Pi has been around for over a decade (officially created in 2009) and it has become a standard in many robotics, home automation, and other types of uses. Especially for “makers” and other tinkerers. But it has also made serious inroads into the professional and enterprise world – just more quietly.
It’s a capable, reliable, and powerful Single Board Computer (SBC) with a robust user community. For all it’s strengths, it does have a few notable weaknesses. The biggest one is security. Not because the SBC itself is insecure. and not because the Operating System (OS) is insecure (it runs Linux, which can be very well secured). The most vulnerable part of the Raspberry Pi is the fact that it boots and runs off of a micro SD card.
While that micro SD card boot mechanism is certainly convenient, it does leave the Pi extremely vulnerable to physical tampering. After all, someone can simply walk up to the Pi, remove the SD card, and they have access to all of the programs and data that was running. They can put that card into their own Pi and they have full access to everything. Well, with a little password hacking, etc.
Making that Pi absolutely secure against physical tampering as well as electronic tampering is a critical step in making a Raspberry Pi a secure device for deploying applications in the field.
Seamless updates of your Pi is also, often, a hassle. Especially if you have more than a handful of them. You have to login to each one, run the updates, and then hope that nothing goes wrong.
Which leads me to recoverability. What happens if one of those updates fails for some reason? especially if it’s in some remote location. How do you ensure that device is recoverable, and how can you get it back online as quickly as possible?
Clearly I’m going to cover a lot of ground, but in the end I’ll show you how you can secure your Raspberry Pi from physical tampering making it virtually impossible to steal your programs and data, how to do secure, remote updates, and how to ensure that those updates are recoverable in case of failure.
Let’s build a new Pi
To start off, let’s build a Raspberry Pi from scratch. If you aren’t interested in this part, and just want to secure an existing Pi, scroll down to section Securing your Pi
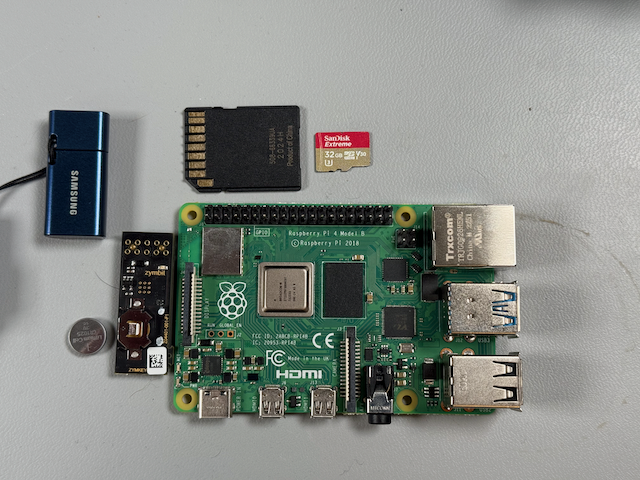
Here are all the things you’ll need in order to complete this. I will include links to the ones I have direct, personal experience using.
- Raspberry Pi (I’m using a Raspberry Pi 4, but you can also use a Raspberry Pi 5 if you prefer)
- Power supply for your Pi. It is important to use a good power supply that supplies enough power for the Pi4 or Pi5. The official supply from the Pi foundation is recommended.
- High quality Micro SD Card I recommend a 32GB card.
- SD Card Reader/Writer (if there isn’t one built-in to your computer)
- High quality USB Flash drive (Note: It should be 2x the size of your SD Card) I like this one from from PNY.
- Zymkey, HSM4 or HSM6 (I’m using a Zymkey here, but an HSM6 will work just fine if you want Hardware Signing)
- CR1025 Battery (a battery is not strictly necessary, but I’m including it here for completeness. The Zymkey uses it to maintain the Real Time Clock (RTC))
Format and image your Micro SD
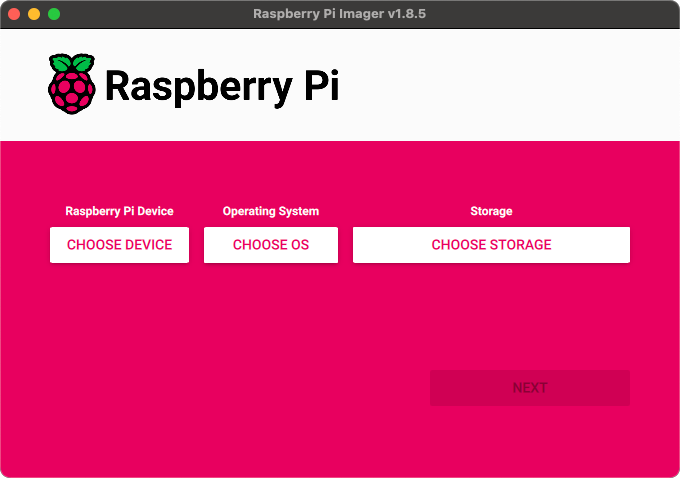
Now that you have all the parts assembled, let’s get started. I’m using the Raspberry Pi Imager tool, but you can use Balena Etcher, or any other SD Card imaging tool you prefer.
When you first start the Pi Imager, you’ll see that you have to make some choices:
First, you’ll want to choose which Pi model you have. I’m using a Pi 4
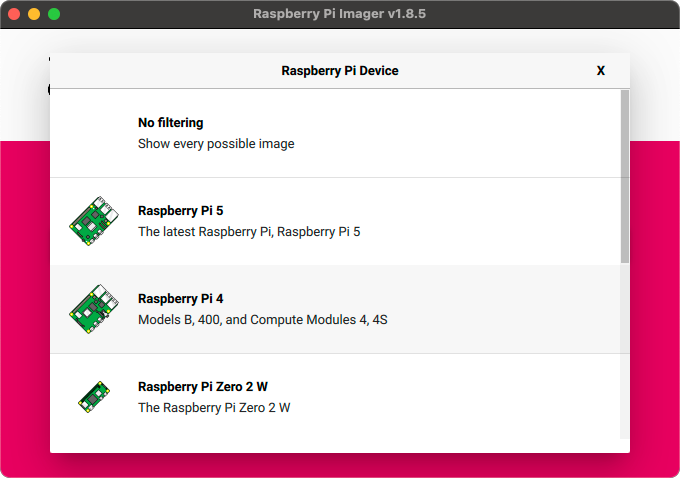
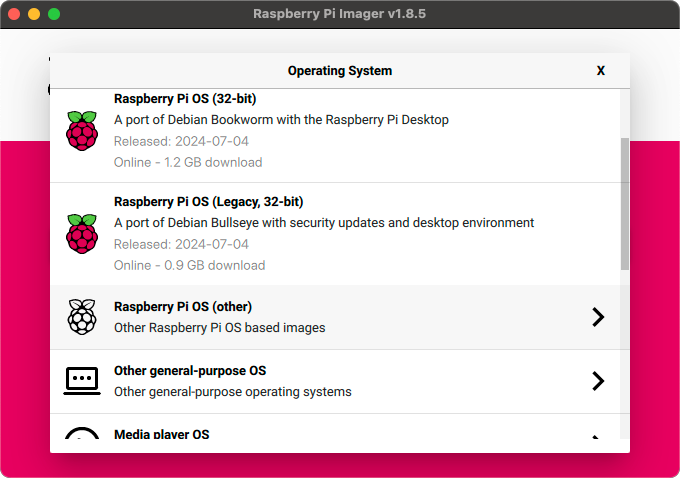
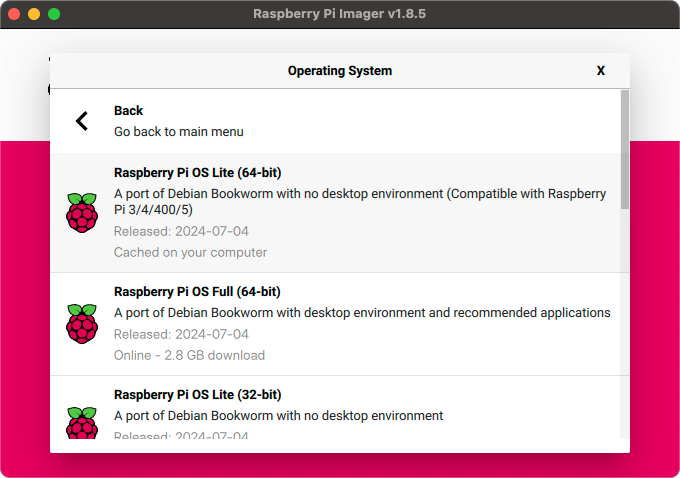
Choose the hardware you have, of course. Next, you’ll choose the Operating System. We are going to use the most recent version (Bookworm, 64-bit), but we won’t be needing the full Desktop environment, so I’m choosing the ‘Lite’ version.
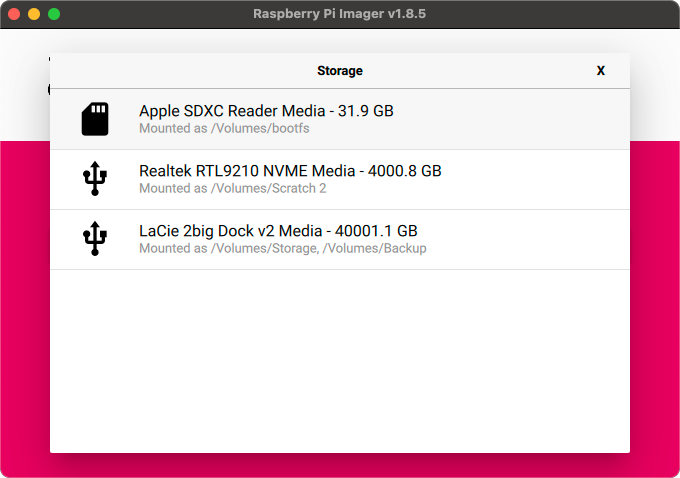
Next, you’ll identify the Micro SD Card you’d like to write to. If you haven’t already, insert the Micro SD Card into SD Card writer and plug it in to your computer.
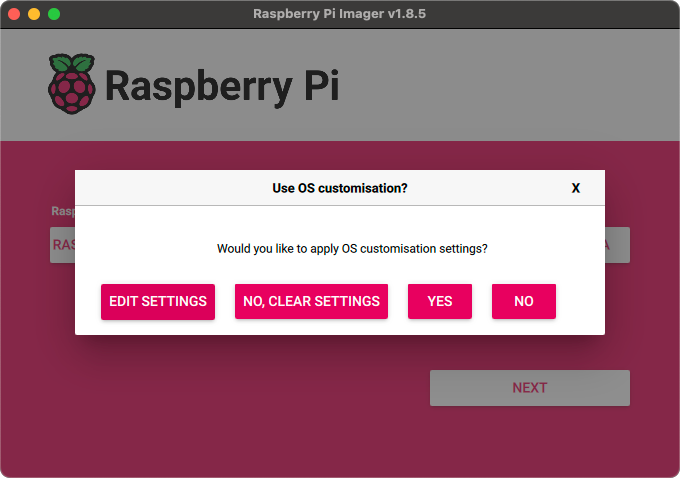
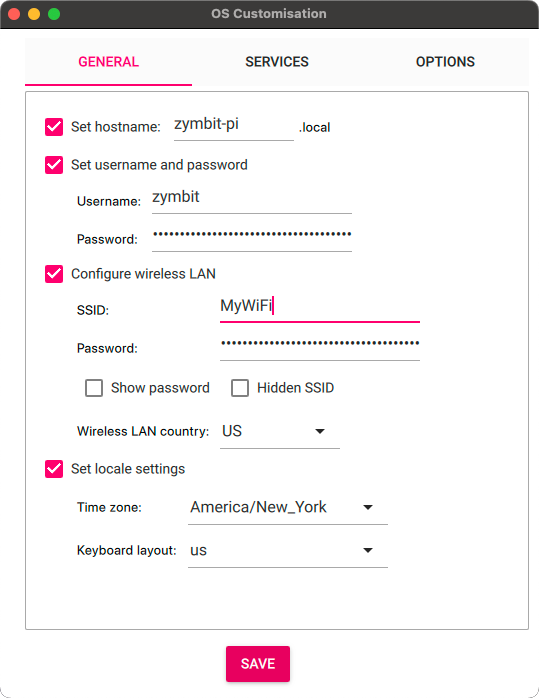
The last step before actually writing the OS to the disk is to set any additional settings you’d like for the Pi. I recommend at least setting up a hostname and username/password, and if you would like to use your local WiFi, the WiFi credentials.
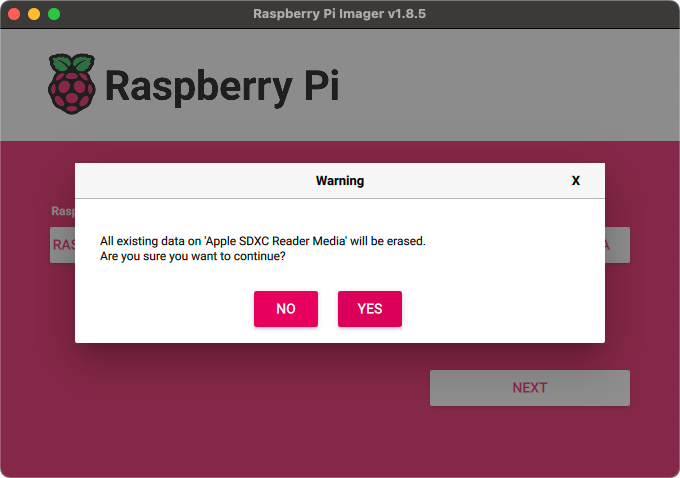
Once you’ve got all the settings right, it’s time to write it all to the card. Note that this will completely erase any existing data on the SD Card, so be careful.
After that, you can sit back and enjoy a cup of coffee while your OS is written to the card. Once it’s done, we can move on to configuring the hardware.
Set up the hardware
This is always my favorite part! First, let’s just see what we need:
Before plugging the Pi in, let’s get the Zymkey put together and installed. About the only thing you need to do is to insert the CR1025 battery into the battery holder.
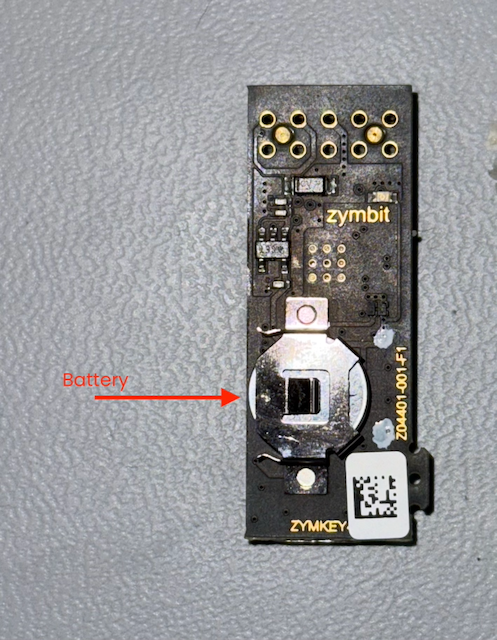
Make sure that the Zymkey is well-seated on the header pins.
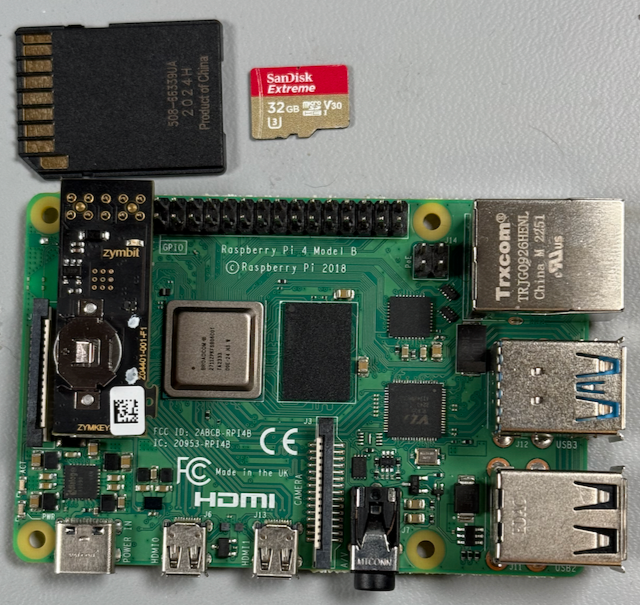
Once the hardware is all put together, insert the SD Card into the slot on the underside of the Pi.

Now it’s time to plug the Pi in to the power supply, wait for it to boot, and get started setting up our security!
Securing your Pi
Now that we’ve got a happily running Pi, let’s go about the important job of making sure that it is secure, updateable, and recoverable. In that order.
Configure your Zymkey
Before we can configure the Zymkey, we need to ensure that the Pi can talk to it. The Zymkey software communicates with the device via I2C, so we need to make sure that the Pi’s I2C interface is enabled.
$ sudo raspi-config
Gets you to the configuration utility.
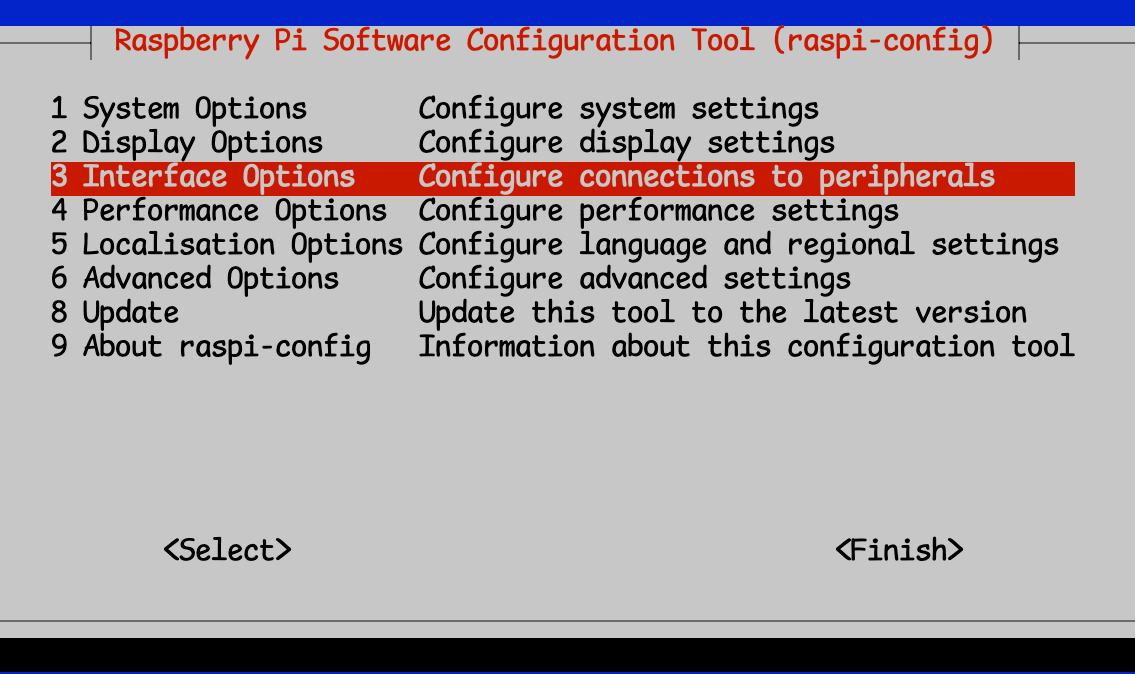
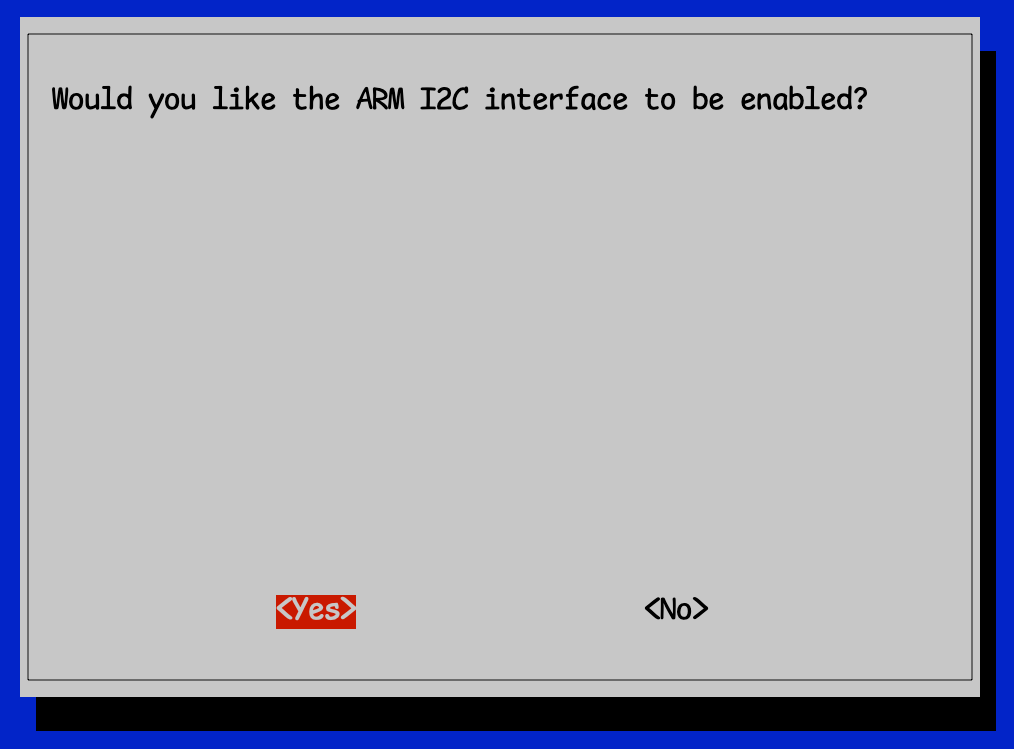
You’ll then select “Interface Options” and then “I2C”
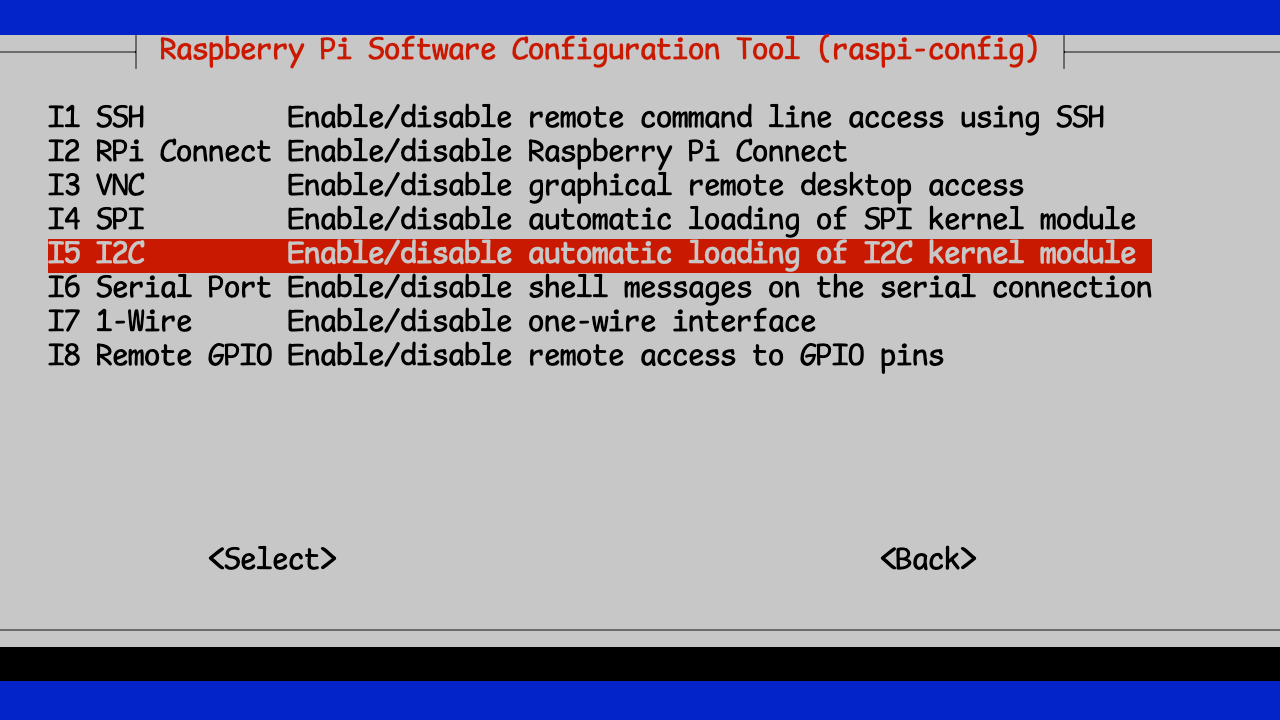
You can then exit and save raspi-config
All of these steps are covered in greater detail in the documentation, so if anything here is confusing, you can always double-check there.
Next, we need to install the required Zymkey Software.
$ curl -G https://s3.amazonaws.com/zk-sw-repo/install_zk_sw.sh | sudo bash
Will install any updates, and then download and install the required Zymbit software.
Note: Installing this software will trigger an automatic reboot of the Pi, so you should not be doing anything else with it while the software is installing.
After the reboot has completed, you should notice that the blue light is no longer flashing rapidly, but is flashing once every 3 seconds. This is your indication that the Zymbit software is properly installed, and able to communicate with the Zymkey.
If you’d like to test to make sure that the Zymkey is installed and functioning properly, you can download and install the test scripts:
wget https://community.zymbit.com/uploads/short-url/eUkHVwo7nawfhESQ3XwMvf28mBb.zip
unzip eUkHVwo7nawfhESQ3XwMvf28mBb.zip
sudo mkdir -p /usr/local/share/zymkey/examples/
sudo mv *.py /usr/local/share/zymkey/examples/
python3 /usr/local/share/zymkey/examples/zk_app_utils_test.py
Testing data lock...
Original Data
01 02 03 04
Encrypted Data
8B B8 06 67 00 00 35 80 82 75 AA BE 89 8C A8 D5
6D 7B 71 48 83 47 B9 9A B7 3A 09 58 41 E6 33 BC
4E 48 7A 32 3A B0 26 D8 59 4F 8C 58 59 97 03 20
3C 99 CF AF 2D CC 47 E5 1B AB 83 FC 6A 3D DE D8
F3 24 9F 73 B5 72 B7 0D 77 8E C6 A8 A3 B3 22 D6
94 8F BD 6A 6C 96 38 EE
Testing data unlock...
Decryped Data
01 02 03 04
Turning LED on...
Testing get_random() with 512 bytes...
B7 B6 BD 78 C6 62 7A CC 80 E0 BD 04 C7 43 29 AC
7A 48 2D 3F E5 43 33 AA 7C 37 F6 BA 7D 3F F2 D3
A9 4B B3 A9 16 4C FD AD 48 61 72 9E 7F B9 09 AE
A7 4A 4F 54 0D CE 6E 85 E6 87 F5 8C D6 58 4B 0E
12 03 4C 71 BD 3A F0 34 79 06 66 5E 65 DC 6E CF
AF 12 72 C1 F1 5D 24 79 A8 D0 F9 40 3E 8E 59 D7
5C ED C5 1E 0E FF 4A 04 69 22 54 F5 13 A1 2E A7
3C B4 CD 30 E7 61 10 B7 E5 07 AD DC E0 FF E9 6E
58 32 50 DA 9F 33 51 F5 8C 16 B5 0C 0F 57 08 E6
E8 00 89 79 DF 16 2A BD FC 27 E0 E4 6C 1B 05 28
EB DE 5B 63 2E F0 E0 21 E8 C5 39 31 26 2A E5 64
79 31 04 7A 60 ED D7 32 6A 8B 4A 29 DD 79 EC D9
2B 72 AC 2E 9A 08 FF 56 06 DB 1C 91 FF D9 3F 10
3E 57 9C 5E B4 32 FD 2E 09 BF 8D 04 6A C8 12 88
06 7C C1 93 FD F7 61 47 90 DD 0D 50 78 78 6C 83
0A 94 DD 5E 9D 83 3F FD 0B 1E 73 23 72 0D 4D D1
82 1F 42 DB EE 1E 7F 85 B9 F1 94 24 54 1B 28 2E
47 24 05 8B 17 0B AE 90 6A DF 0B BC E1 53 B2 96
1C 87 D4 FD A0 EC FC 85 E4 9F 04 F6 B8 E0 37 B2
40 17 33 3A FA 96 01 0C B2 4C 4D FE E7 64 0E 87
4E 4B A8 D0 97 C6 A5 42 F4 02 E4 CC 7C 2B 3A A8
C7 33 22 3C 76 1C 40 42 1F 5A 78 7B 23 FB 0B 39
BD 9F 38 13 6B FE D9 54 C9 D2 F3 97 C6 39 F3 09
9C 6B DC 82 C1 25 99 70 8B 2B 46 FD CD 51 C9 09
20 16 DA 4C D3 58 B6 BB D7 C3 E4 A9 34 F0 5C 85
D7 19 6D A8 F7 26 D6 41 6F 27 04 2C A0 C4 50 9D
28 43 0D DC E2 7E D4 9E 29 FE 45 B2 BF 14 77 A7
AD F4 43 4B 51 85 85 06 7F 02 BF 21 DA C4 BD A4
9B 94 71 FA 21 8B 9E B6 07 48 7F 50 A7 CF 32 2F
8F 98 A1 E1 FE 1B 2E 24 B5 BF 69 E7 DE 3D 11 6C
48 5B 56 5C BF 96 FB 30 BB 86 13 C4 53 61 AD 6E
09 0C A9 4B C1 2F 12 3F BF 34 FB 01 D7 62 13 7A
Turning LED off...
Flashing LED off, 500ms on, 100ms off...
Testing zkCreateRandDataFile with 1MB...
Turning LED off...
Testing get_ecdsa_public_key()...
20 AD 20 7A 0E D9 A5 81 BF 44 80 54 C6 DC A7 8C
D1 D5 7B EE 6D C5 E3 B4 92 8C 0E BF 42 6E D9 9E
AA 04 29 CD 4C D9 3A BC 58 5B DD 47 43 39 30 C8
2E FD C6 D9 C9 82 60 06 A4 A0 7F EA F9 C0 76 E9
Testing create_ecdsa_public_key_file()...
$ python3 /usr/local/share/zymkey/examples/zk_crypto_test.py
Signing data...OK
Verifying data...OK
Verifying tainted data...FAIL, yay!
Generating random block from Zymkey (131072 bytes)...
Encrypting random block...
Decrypting encrypted block...
PASS: Decrypted data matches original random data
Done!
Congratulations!
Finally, making it secure
Now that we have a proper security device installed, tested, and ready let’s secure this thing. At the very same time, let’s make sure that we can securely update the device when the time comes, and that it is built to be recoverable in case an update fails.
Ordinarily this would be a ton of work, but we’re going to simplify everything and do it pretty much all at once.
A place to put the backup image
Since we will be using Bootware(r) to secure our device, we will need a place for the system to copy the entire SD Card as it encrypts it. For this, we’re going to use a USB Drive.
We need to make sure that we can use our USB Drive properly. I often re-use them for other tasks, so here’s how I like to start out. After plugging the USB Drive in, I make sure to “zero out” the drive, then create a brand new partition map and file system on it.
sudo dd if=/dev/zero of=/dev/sda bs=512 count=1 conv=notrunc
1+0 records in
1+0 records out
512 bytes copied, 0.0197125 s, 26.0 kB/s
That clears the previous file system, if any.
sudo fdisk -W always /dev/sda
Welcome to fdisk (util-linux 2.38.1).
Changes will remain in memory only, until you decide to write them.
Be careful before using the write command.

Device does not contain a recognized partition table.
Created a new DOS (MBR) disklabel with disk identifier 0x27b0681a.

Command (m for help): n
Partition type
   p   primary (0 primary, 0 extended, 4 free)
   e   extended (container for logical partitions)
Select (default p): p
Partition number (1-4, default 1):
First sector (2048-125313282, default 2048):
Last sector, +/-sectors or +/-size{K,M,G,T,P} (2048-125313282, default 125313282):

Created a new partition 1 of type 'Linux' and of size 59.8 GiB.
Partition #1 contains a ext4 signature.

The signature will be removed by a write command.

Command (m for help): w
The partition table has been altered.
Calling ioctl() to re-read partition table.
Syncing disks.
The important parts there are, once you’ve entered the sudo fdisk -W always /dev/sda you will enter n to create a new partition map. Then p to make it a Primary partition, and finally w to write the partition map to the disk. For everything else, I just accept the defaults as presented.
Finally, now that we have a partitioned USB Drive, we have to create a proper file system on it.
sudo mkfs.ext4 -j /dev/sda1 -F
mke2fs 1.47.0 (5-Feb-2023)
Creating filesystem with 15663904 4k blocks and 3916304 inodes
Filesystem UUID: 4a3af5d0-bac4-4903-965f-aa6caa8532cf
Superblock backups stored on blocks:
  32768, 98304, 163840, 229376, 294912, 819200, 884736, 1605632, 2654208,
  4096000, 7962624, 11239424

Allocating group tables: done
Writing inode tables: done
Creating journal (65536 blocks): done
Writing superblocks and filesystem accounting information: done
Tip: If, like me, you get tired of typing
sudoall the time, you can runsudo -ionce and get a root prompt from which to run all your commands. But remember, with great power comes great responsibility!
Installing Bootware(r)
Bootware is the Zymbit tool for securing and updating your Raspberry Pi. It is a powerful tool that allows you to update one, or an entire fleet, or Pis across your enterprise. And it allows you to do it safely, securely, and in a way that is recoverable if something goes wrong.
First, we have to run the installer
$ curl -sSf https://raw.githubusercontent.com/zymbit-applications/zb-bin/main/install.sh | sudo bash
This installer will ask you a couple of simple questions, so let’s go through the answers. The first is whether or not you’d like to include Hardware Signing. If you have an HSM6 or SCM-based product, you can answer yes to this question. If you’ve got a Zymkey or HSM4, Hardware Signing is not supported, so you don’t need to install it. Even with software signing, your final LUKS encrypted partitions will be protected by the Zymbit HSM keys.
Next it will ask you which version of Bootware to install. Choose the most recent version.
zb-install.sh: bootstrapping the zbcli installer
  ---------
  Pi Module:         Raspberry Pi 4/Compute Module 4
  Operating System:  Rpi-Bookworm
  Zymbit module:     Zymkey
  Kernel:            kernel8.img
  ---------

✔ 'zbcli' comes with software signing by default. Include hardware key signing? (Requires SCM or HSM6) · No
✔ Select version · zbcli-1.2.0-rc.26
Installing zbcli
Installed zbcli. Run 'zbcli install' to install Bootware onto your system or 'zbcli --help' for more options.
zb-install.sh: cleaning up
Now that the installer is ready, it’s time to install Bootware itself:
sudo zbcli install
The installer will ask you if you’re ready to reboot when it’s done:
  ---------
  Pi Module:         Raspberry Pi 4
  Operating System:  Rpi-Bookworm
  Zymbit module:     Zymkey
  Kernel:            kernel8.img
  ---------
       Found kernel '/boot/firmware/kernel8.img'
     Created '/etc/zymbit/zboot/mnt'
     Created '/etc/zymbit/zboot/scripts'
     Created '/etc/zymbit/zboot/zboot_backup'
     Created '/boot/firmware/zboot_bkup'
   Installed 'u-boot-tools'
     Created '/etc/fw_env.config'
     Created '/usr/bin/zbconfig'
       Found OpenSSL 3
     Created '/boot/firmware/zb_config.enc'
    Modified zbconfig 'kernel_filename'
   Installed zboot
    Modified '/etc/rc.local'
     Created '/lib/cryptsetup/scripts/zk_get_shared_key'
    Modified '/boot/firmware/config.txt'
     Created '/etc/update-motd.d/01-zymbit-fallback-message'
    Modified /etc/update-motd.d/01-zymbit-fallback-message
✔ A reboot into zboot is required. Reboot now? · yes
    Finished in 29.1s
Configuring Bootware
This is where the real fun begins! If you’ve ever used LUKS to encrypt a Pi filesystem before, you know that, while it’s a great step in securing your Pi, you still have to store that encryption key somewhere that is accessible at boot time.
With Bootware and a Zymbit HSM, the LUKS encryption key is locked by the Zymbit HSM, making it much more secure. Bootware expects the boot image to be in a specific, encrypted format called a z-image. The Bootware CLI tool helps you create and manage these images for deployment across your enterprise.
So let’s create our first z-image, and we’ll use the current system as the basis for it.
First, we need to mount the USB Drive so that we have someplace to put our z-image:
$ sudo mount /dev/sda1 /mnt
Next, we’ll run the imaging tool to create an encrypted z-image of our current system:
sudo zbcli imager
   Validated bootware installation
  ---------
  Pi Module:         Raspberry Pi 4
  Operating System:  Rpi-Bookworm
  Zymbit module:     Zymkey
  Kernel:            kernel8.img
  ---------
     Created '/etc/zymbit/zboot/update_artifacts/tmp'
✔ Enter output directory · /mnt
✔ Enter image name · z-image-1
✔ Select image type · Full image of live system
✔ (Optional) enter image version · 1.0
✔ Select key · Create new software key
Notice that I used the mount point for the USB Drive as our output directory. I then chose a name and version number for the image and chose to use a software key, since I’m using a Zymkey.
Don’t be surprised if this step takes a while. What it’s doing is making a complete copy of the files on the running disk, and signing it with the hardware key that it has generated
     Created signing key
     Created '/etc/zymbit/zboot/update_artifacts/file_manifest'
     Created '/etc/zymbit/zboot/update_artifacts/file_deletions'
    Verified path unmounted '/etc/zymbit/zboot/mnt'
     Cleaned '/etc/zymbit/zboot/mnt'
     Deleted '/etc/crypttab'
    Verified disk size (required: 2.33 GiB, free: 26.39 GiB)
     Created initramfs
     Created snapshot of boot (/etc/zymbit/zboot/update_artifacts/tmp/.tmpBgEBJk/z-image-1_boot.tar)
     Created snapshot of root (/etc/zymbit/zboot/update_artifacts/tmp/.tmpBgEBJk/z-image-1_rfs.tar)
     Created '/mnt/tmp'
     Cleaned '/mnt/tmp'
     Created staging directory (/mnt/tmp/.tmpEhjNN7)
     Created '/mnt/tmp/.tmpEhjNN7/header.txt'
     Created tarball (/mnt/tmp/.tmpEhjNN7/update_artifact.tar)
     Created header signature
     Created update artifact signature
     Created file manifest signature
     Created file deletions signature
     Created '/mnt/tmp/.tmpEhjNN7/signatures'
     Created signatures (/mnt/tmp/.tmpEhjNN7/signatures)
      Copied file (/etc/zymbit/zboot/update_artifacts/file_manifest) to (/mnt/tmp/.tmpEhjNN7/file_manifest)
      Copied file (/etc/zymbit/zboot/update_artifacts/file_deletions) to (/mnt/tmp/.tmpEhjNN7/file_deletions)
     Created tarball (/mnt/z-image-1.zi)
     Created '/mnt/z-image-1_private_key.pem'
       Saved private key '/mnt/z-image-1_private_key.pem'
     Created '/mnt/z-image-1_pub_key.pem'
       Saved public key '/mnt/z-image-1_pub_key.pem'
     Cleaned '/mnt/tmp'
       Saved image '/mnt/z-image-1.zi' (2.33 GiB)
    Finished in 384.8s
The public/private keypair is saved on the USB Drive, and we will need it later.
A/B partitioning
Some background here is probably appropriate. The idea of A/B partitioning is an important concept for recoverability. If you have a single disk partition that your devices boots from, and you update critical items in that partition that are somehow corrupted, your device may be left in a state where it is impossible to boot or recover. It’s bricked. The only way to recover such a device typically is to physically access the device and make direct changes to the SD Card. This is not always practical, or even possible.
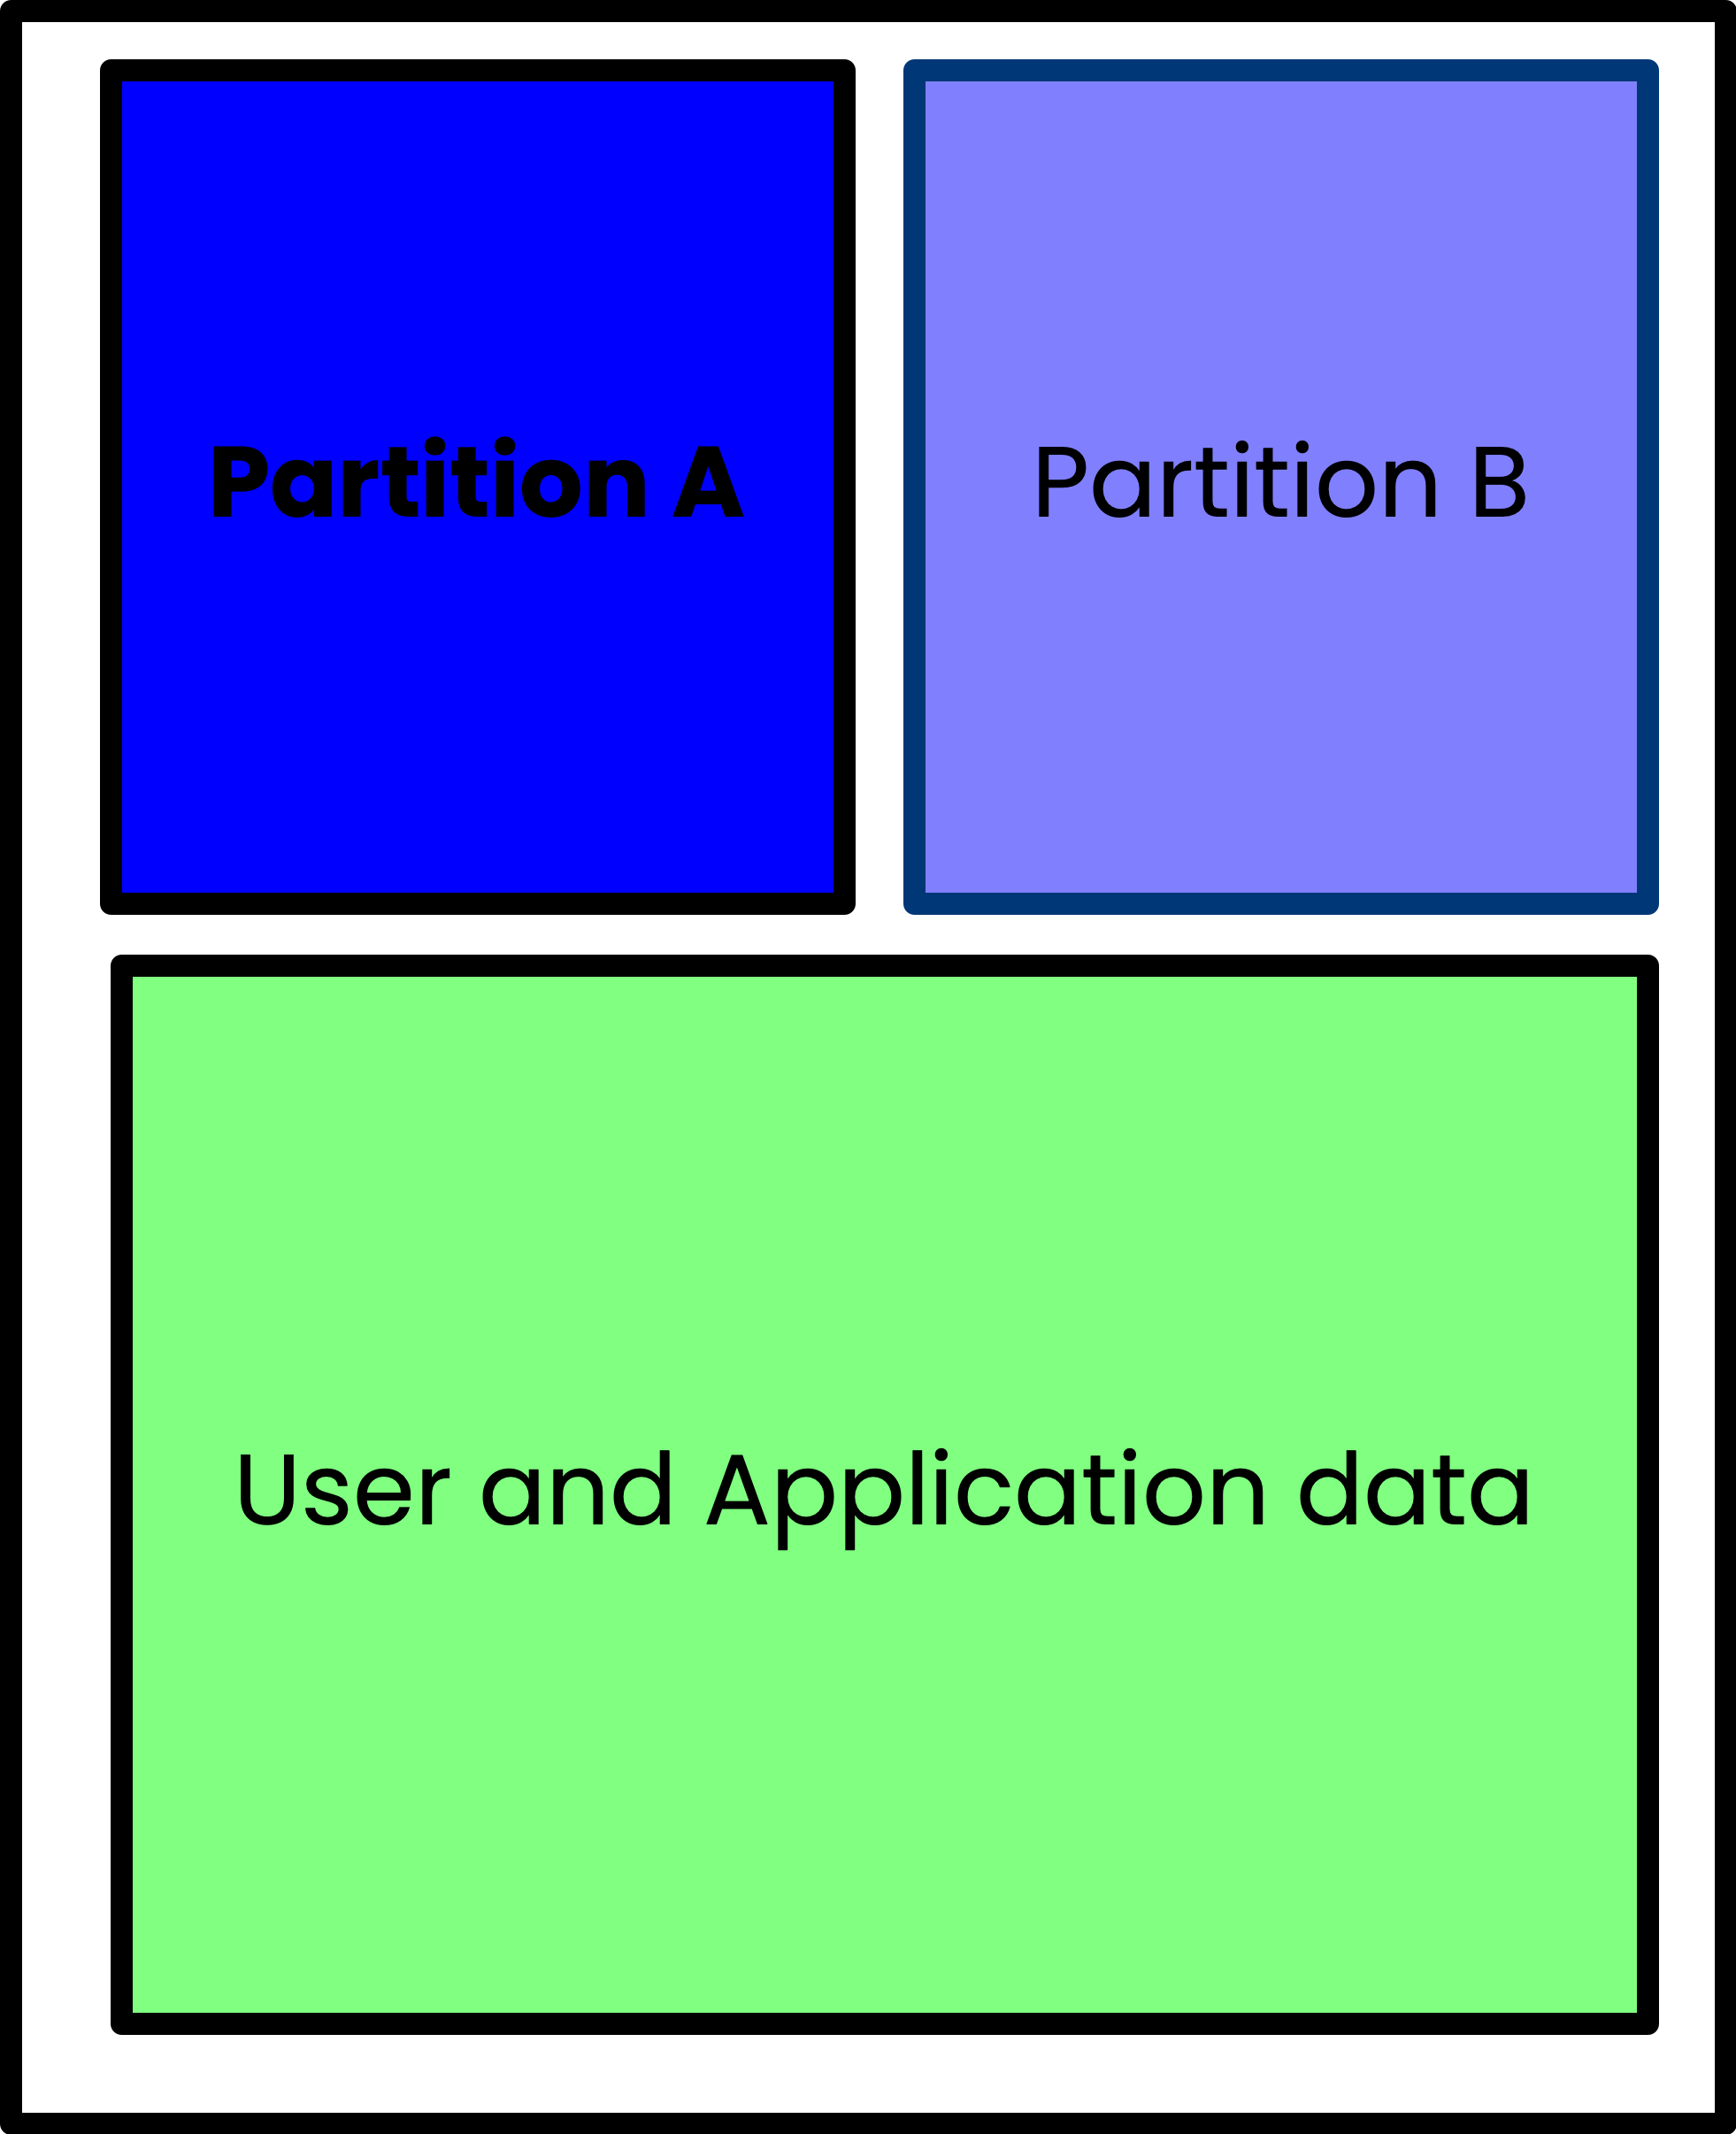
With A/B partitioning you create dual boot partitions and only run from one. That is the known-good or primary partition. You then have a secondary partition where you can apply updates. Once an update is applied to the secondary partition, the device reboots from that newly updated partition. If the update is successful, your system is back up and running and that partition is then marked as the primary, and it will reboot from that known-good partition from now on.
If the update fails for some reason and the device cannot properly boot from the updated partition, the system reboots from the previously used primary partition, and it can continue to run until a fixed update can be deployed.
With this partitioning scheme in place, your Pi is much less likely to end up bricked as you can maintain a known-good partition at all times from which to boot.
Bootware encrypts the A, B, and DATA partitions. The A and B partition are locked with unique LUKS keys, meaning you cannot access the Backup partition from the Active partition. The encrypted DATA partition is accessible from either the A or B partition.
Setting up this A/B partitioning scheme is usually quite cumbersome and difficult to implement. Zymbit’s Bootware has taken that process and simplified it such that it’s a relatively easy process. So let’s go through that process now and make your Pi both secure and resilient.
Create A/B partitions
Since we’ve not previously had a backup B partition, we will create one, and we will place the current image (which we know is good, since we’re currently running it) into that partition. To do that, we will update the configuration (really create it) with the zbcli tool.
$ sudo zbcli update-config
   Validated bootware installation
  ---------
  Pi Module:         Raspberry Pi 4
  Operating System:  Rpi-Bookworm
  Zymbit module:     Zymkey
  Kernel:            kernel8.img
  ---------
        Info the root file system will be re-partitioned with your chosen configuration.
This process will ask you some questions to determine how to lay out your partitions. The first is what device partition layout you would like to use. Choose the recommended option:
? Select device partition layout after an update ›
❯   [RECOMMENDED] A/B: This will take the remaining disk space available after the boot partition and create two encrypted partitions, each taking up half of the remaining space. Most useful for rollback and reco
       Using partition layout (A/B)
        Info the root file system will be re-partitioned with your chosen configuration.
Next you will select the update policy. Again, just choose the recommended one.
? Select update policy ›
❯   [RECOMMENDED] BACKUP: Applies new updates to current backup filesystem and swap to booting the new updated backup partition as the active partition now. If the new update is bad, it will rollback into the pre
     Running [========================================] 2/1 (00:00:17):                                                                                                                                             WARNING! Detected active partition (28.71GB) is larger than 14.86GB needed for two filesystems.
 Active partition won't be saved!!!
 Changing update mode to UPDATE_BOTH!!!
       Using update mode (UPDATE_BOTH)
        Data partition size currently set to: 512 MB
        Info bootware will create a shared data partition after A/B in size MB specified
Next, you can select the size of the data partition. It defaults to 512MB, but I suggest increasing that to 1024MB.
✔ Enter size of data partition in MB · 1024
       Using Data Partition Size 1024MB
  Defaulting to configured endpoint '/dev/sda1'
        Info update endpoints can be either an HTTPS URL or an external mass storage device like a USB stick.
       Found update name 'z-image-1'
       Saved update name 'z-image-1'
       Using update endpoint '/dev/sda1'
Configuration settings saved
    Finished in 42.1s
We’ve now got a system that is configured to have A/B partitioning, and to apply updates to the backup partition when they are available.
To complete the process, we will actually apply the update (which is really just a copy of the currently running system). This will trigger the re-partitioning and a reboot.
First though, we need to get the public key (created previously and stored on the USB Drive) so that we will be able to decrypt the image. To do that, let’s copy it to the local directory:
sudo mount /dev/sda1 /mnt
cp /mnt/z-image-1_pub_key.pem .
$ sudo zbcli update
   Validated bootware installation
  ---------
  Pi Module:         Raspberry Pi 4
  Operating System:  Rpi-Bookworm
  Zymbit module:     Zymkey
  Kernel:            kernel8.img
  ---------
     Cleaned '/etc/zymbit/zboot/update_artifacts/tmp'
       Found update configs
? Proceed with current configs? These can be modified through 'zbcli update-config'
  ---------
  Update endpoint   /dev/sda1
  Update name       z-image-1
  Endpoint type     LOCAL
  Partition layout  A/B
  Update policy     UPDATE_BOTH
  ------reading_time: 24 minutes
---
     Created temporary directory (/etc/zymbit/zboot/update_artifacts/tmp/.tmpCfhm6c)
✔ Enter public key file (Pem format) · ./z-image-1_pub_key.pem
     Mounted '/dev/sda1' to '/etc/zymbit/zboot/update_artifacts/tmp/.tmpyKYgR3'
       Found image tarball (/etc/zymbit/zboot/update_artifacts/tmp/.tmpyKYgR3/z-image-1.zi)
    Unpacked '/etc/zymbit/zboot/update_artifacts/tmp/.tmpCfhm6c/update_artifact.tar'
    Unpacked '/etc/zymbit/zboot/update_artifacts/tmp/.tmpCfhm6c/signatures'
    Unpacked '/etc/zymbit/zboot/update_artifacts/tmp/.tmpCfhm6c/header.txt'
    Unpacked '/etc/zymbit/zboot/update_artifacts/tmp/.tmpCfhm6c/file_manifest'
    Unpacked '/etc/zymbit/zboot/update_artifacts/tmp/.tmpCfhm6c/file_deletions'
     Decoded header signature
     Decoded image signature
     Decoded manifest signature
     Decoded deletions signature
       Found header data
       Found image data
       Found manifest data
       Found file deletions data
    Verified header signature
    Verified image signature
    Verified manifest signature
    Verified file deletions signature
    Modified zbconfig 'public_key'
    Modified zbconfig 'new_update_needed'
    Modified zbconfig 'root_a'
    Modified zbconfig 'root_b'
    Modified zbconfig 'root_dev'
      Copied file (/boot/firmware/usr-kernel.enc) to (/boot/firmware/zboot_bkup/usr-kernel-A.enc)
      Copied file (/boot/firmware/kernel8.img) to (/boot/firmware/zboot_bkup/kernel8.img)
    Modified zbconfig 'update_with_new_image'
    Modified zbconfig 'kernel_filename'
? Scheduled update for the next reboot. Reboot now? (y/n) › yes
When it asks to reboot, say yes, and then wait.
Once your Pi is rebooted, log in and check to see that it’s correct.
$ lsblk
NAME              MAJ:MIN RM  SIZE RO TYPE  MOUNTPOINTS
sda                 8:0    1 59.8G  0 disk
└─sda1              8:1    1 59.8G  0 part
mmcblk0           179:0    0 29.7G  0 disk
├─mmcblk0p1       179:1    0  512M  0 part  /boot/firmware
├─mmcblk0p2       179:2    0 14.1G  0 part
│ └─cryptrfs_A    254:0    0 14.1G  0 crypt /
├─mmcblk0p3       179:3    0 14.1G  0 part
└─mmcblk0p4       179:4    0    1G  0 part
  └─cryptrfs_DATA 254:1    0 1008M  0 crypt
Notice that we now have two cryptfs devices. These are fully signed and encrypted filesystems.
What if the update had failed? Here’s the beauty of A/B partitioning with Bootware: if the system fails to boot (it fails to reach a systemd init target for 3 times in a row), Bootware will revert to the known-good partition, bringing your device back on-line.
Bonus Exercise
Here, we have simply used the USB Drive as the source for the update. But there are other options! we could copy that z-image to a an Amazon S3 bucket, or one of our own servers, and then configure bootware to pull the update from that location. You would need to re-run zbcli update-config and, for the endpoint, use the location on the internet where you stored the image.
Conclusions
We have now built a complete, secure Raspberry Pi from scratch. Just as importantly, we have now enabled that Pi to be updated safely and securely and we can be assured that a failed update won’t brick the Pi.
Are all of these things possible without a Zymkey and Bootware? Yes, mostly. You can encrypt your filesystem with LUKs, but then you have to manually manage where the key is stored, and make sure you keep it safe. You can also do remote updates, but (and this is a very large caveat), you have no assurances that the update will succeed, and that the update won’t brick your device, or that the update can’t be tampered with in some way.
With the device we have just built we can be assured that the filesystems are securely signed and encrypted, that we don’t have to worry about managing the encryption keys, that the keys themselves are stored securely, and that we can reliably update the device and not have to worry about it failing to boot after an update.
If you have further questions, or would like to talk more about Bootware, Zymkey, or any of the topics covered here, please join our community! We’d love to hear your feedback and answer any questions you may have.